Ball Exercises and Workouts
As an athlete with excellent core stability you will generate greater power, and strength in any off balance situation. You will run, swing, jump, and swim with greater efficiency. You will be able to apply the strength you have developed in the gym more effectively in functional and competitive situations. Whether you have never exercised a day in your life or you're a professional athlete, you can benefit from strengthening using the exercise ball. The free exercise ball exercises presented here represent a combination of the latest concepts from both the physical therapy realm and the physical conditioning world and are accompanied by illustrations. We try to review both the theory and rationale behind the ball exercises and present them with detailed instructions and photographs
Table of Contents
1. Stretches
2. Before the Ball
3. Progression
4. List of Ball Exercises
Here is a list of ball exercises and positions using the ball during labout.
1. Stretches
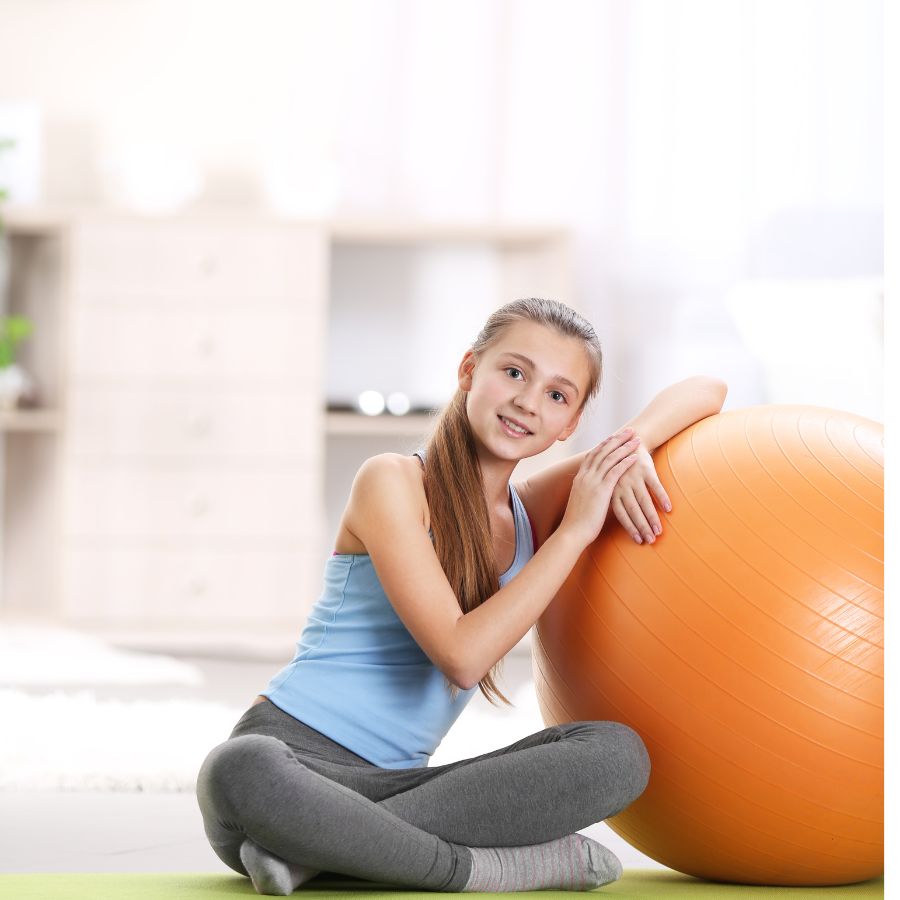
Good flexibility allows us to do our daily tasks with minimal effort and strain. More demanding tasks such as running, jumping, or swimming are also easier if your joints can be moved through their full range with minimal effort. Good flexibility minimizes the risk of injury by allowing our joints to move through their full range of motion without putting strain on capsular structures or ligaments. Stretching exercises help muscles to relax and good flexibility allows us to maintain good posture.
Review all contraindications and precautions for stretching.
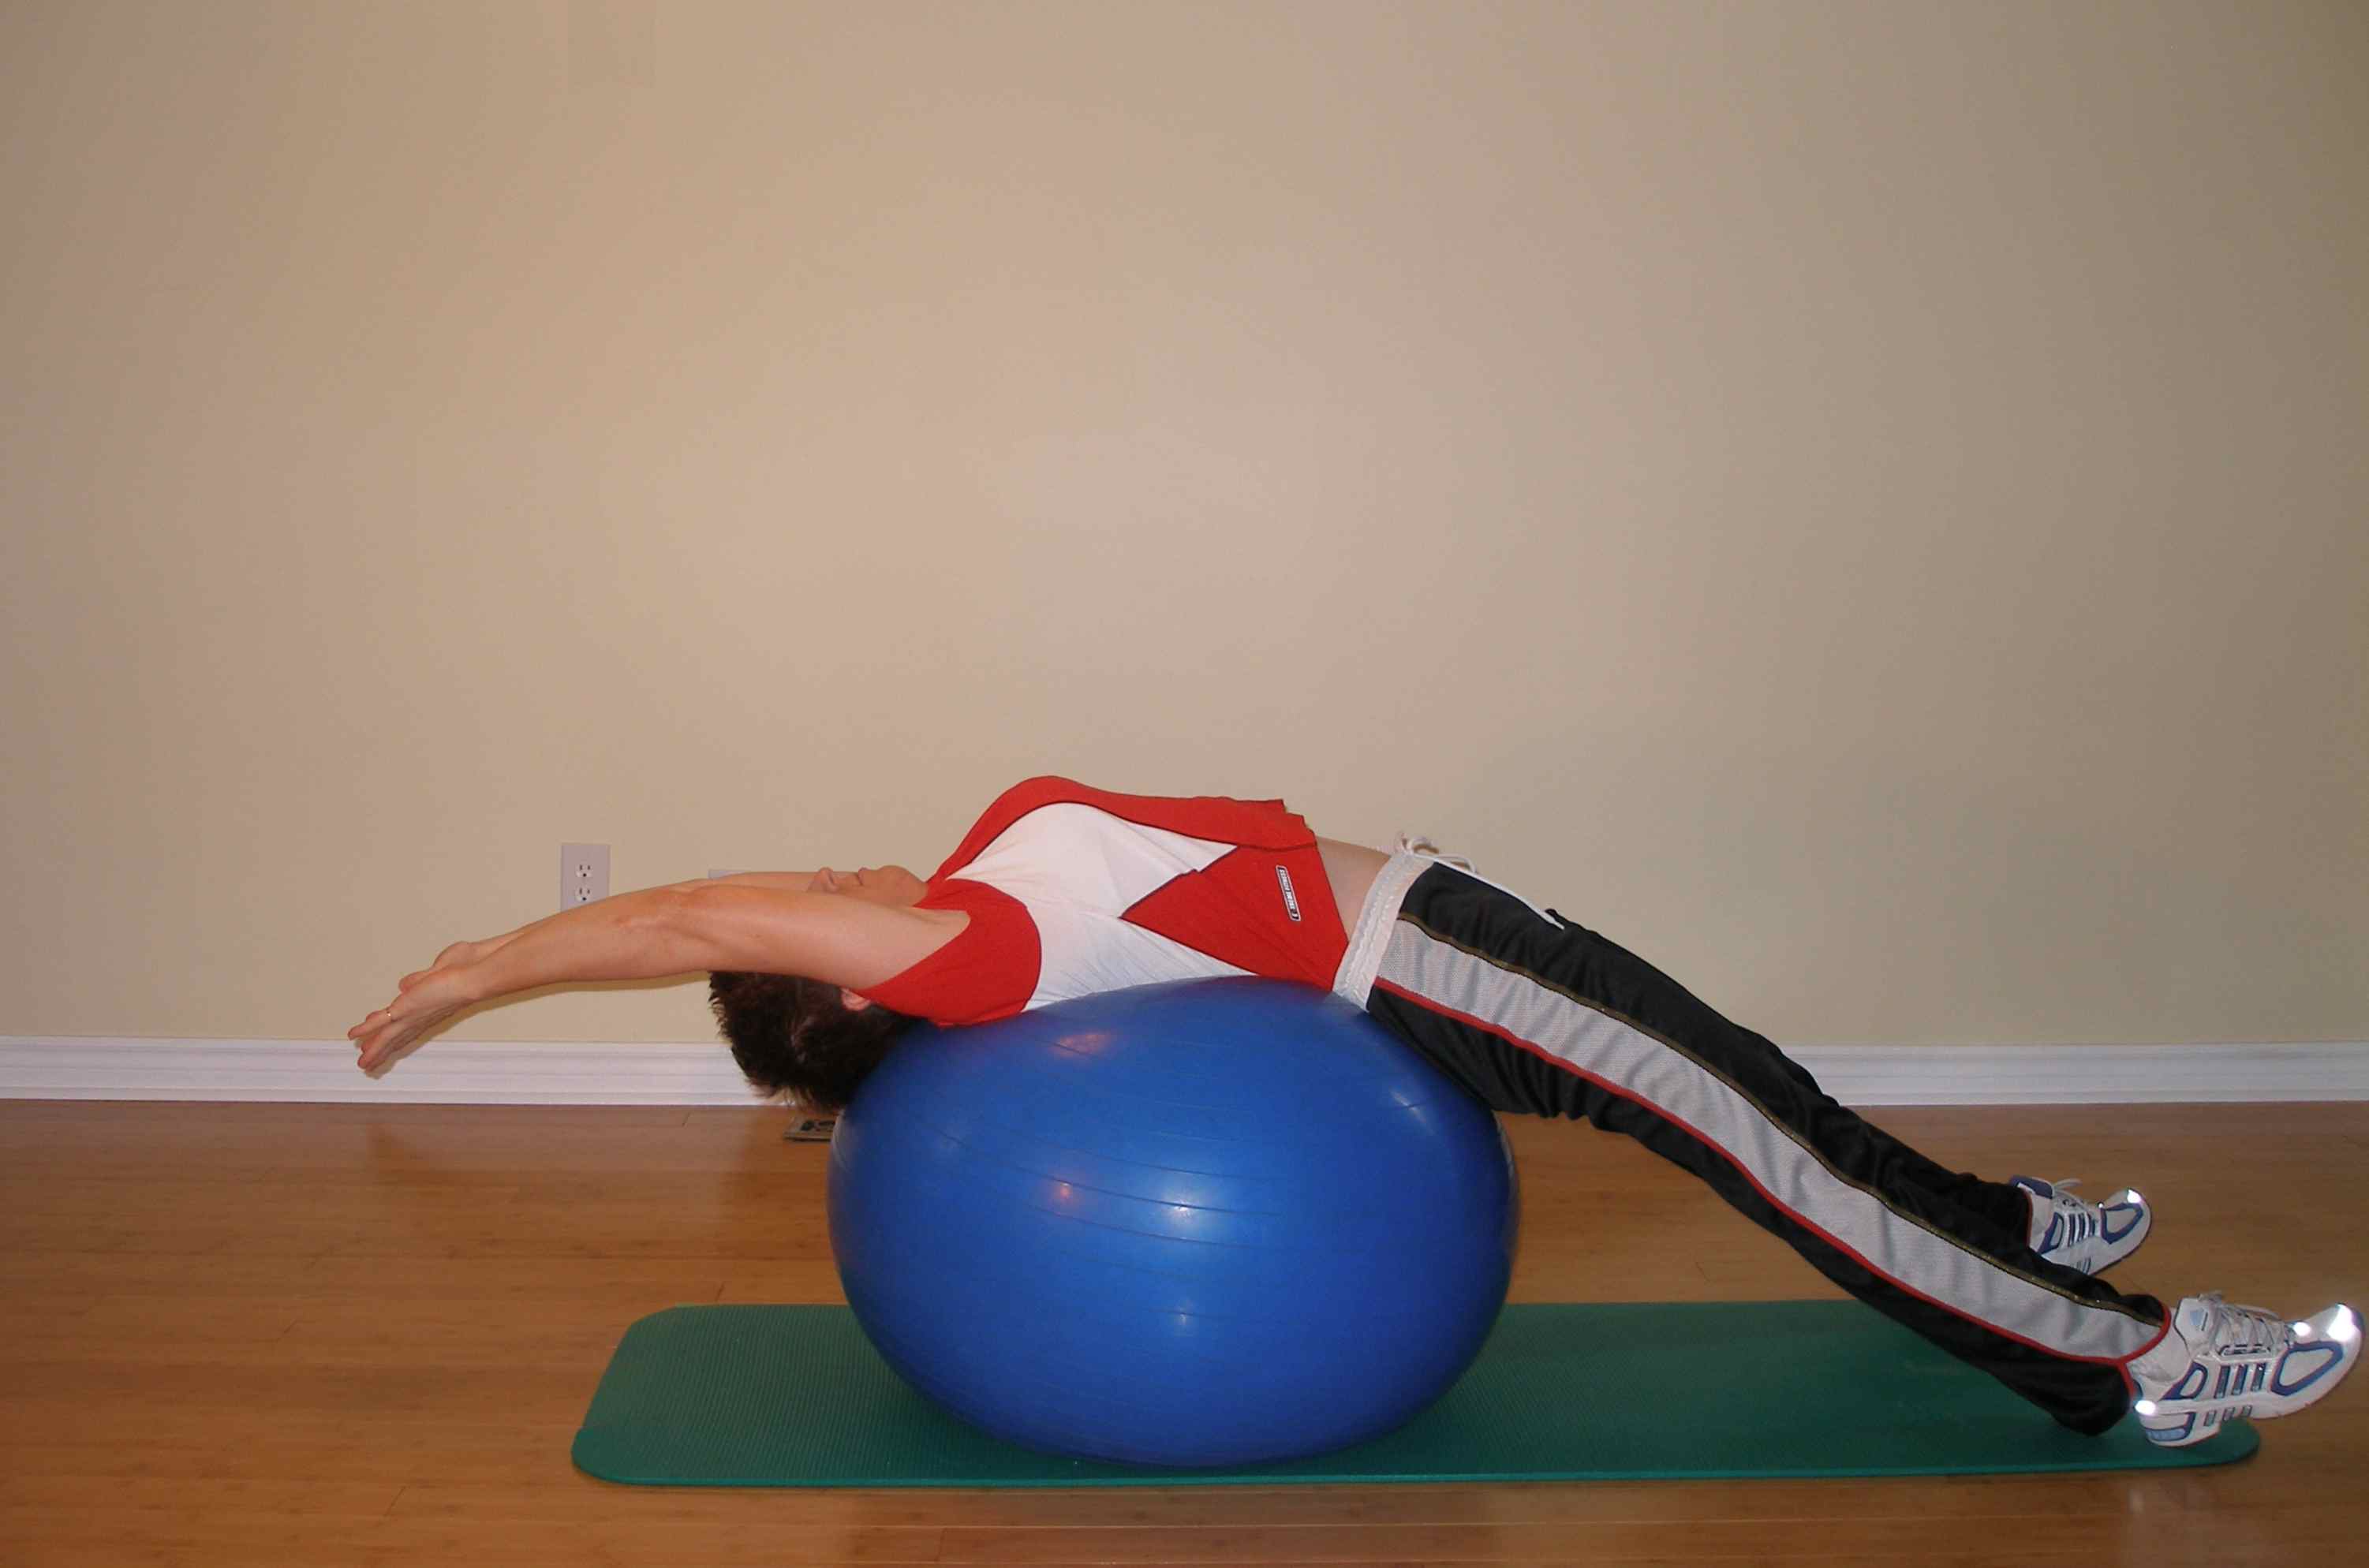
Back Extension on the Ball
Lie back over the exercise ball with the ball centred under your thoracic spine.
Allow your back to gently arch over the ball.
Reach arms overhead keeping your elbows straight.
Hold this position.
Stretches: Abdominals, anterior spinal ligaments, hip flexors, latissimus dorsi, pectoral muscles

Hip Adductor Stretch
Put your exercise ball on the floor in front of you.
Place your feet wide, knees bent, and keep your back straight.
Bending one knee, lunge to the side until you feel a stretch on the inside of your thigh.
Hold this position.
Stretches: Hip adductors

Trunk Side Stretch
Sit on the exercise ball with a neutral lumbar posture.
Chest should be up, shoulder blades down and back, and head back over your shoulders.
Keep your feet flat on the ground shoulder width or slightly further apart.
Roll the ball to the left, bending your left knee and reaching your left hand to the ceiling.
Hold this position.
Stretches: Latissimus dorsi, trunk side flexors.
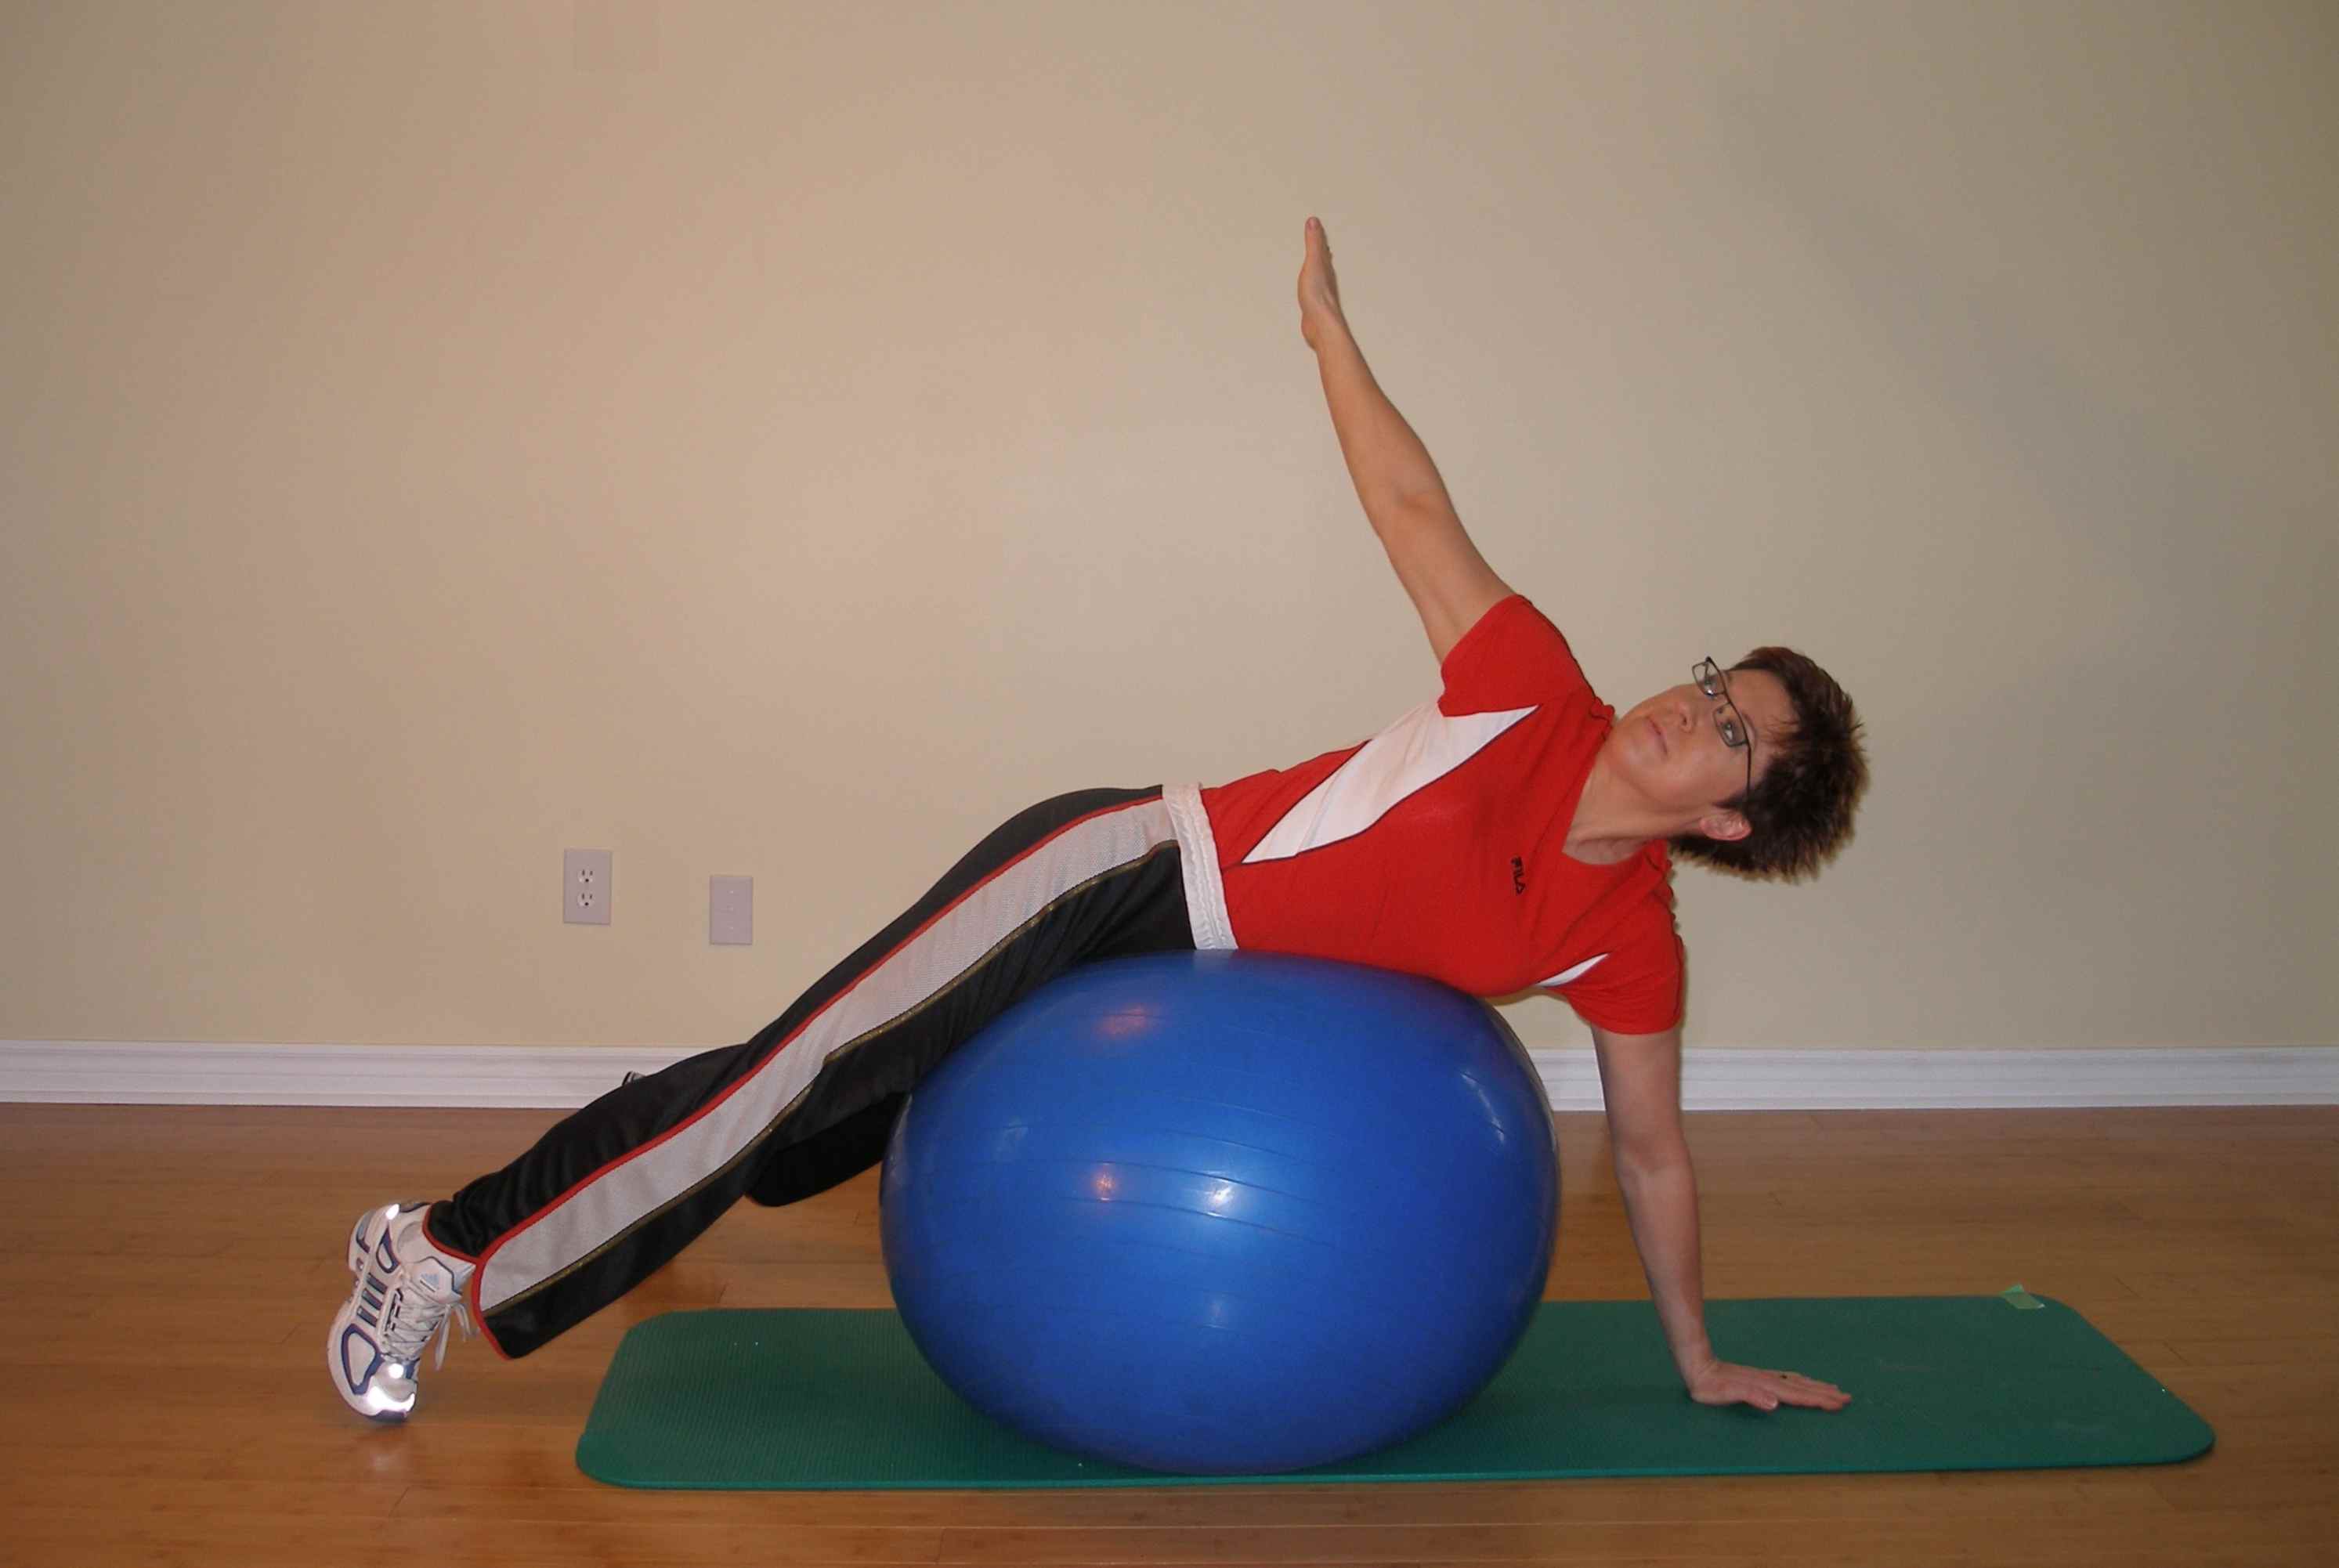
Prone Trunk Rotation
Start by lying prone over the ball with chest slightly raised.
Your exercise ball should be centred under your belt line.
Hands rest lightly on the floor in front of you.
Take one hand and keeping your arm straight reach up and back toward the ceiling .
Follow with your head and look toward the ceiling
Hold this position.
Stretches: Trunk rotators, spinal ligaments.
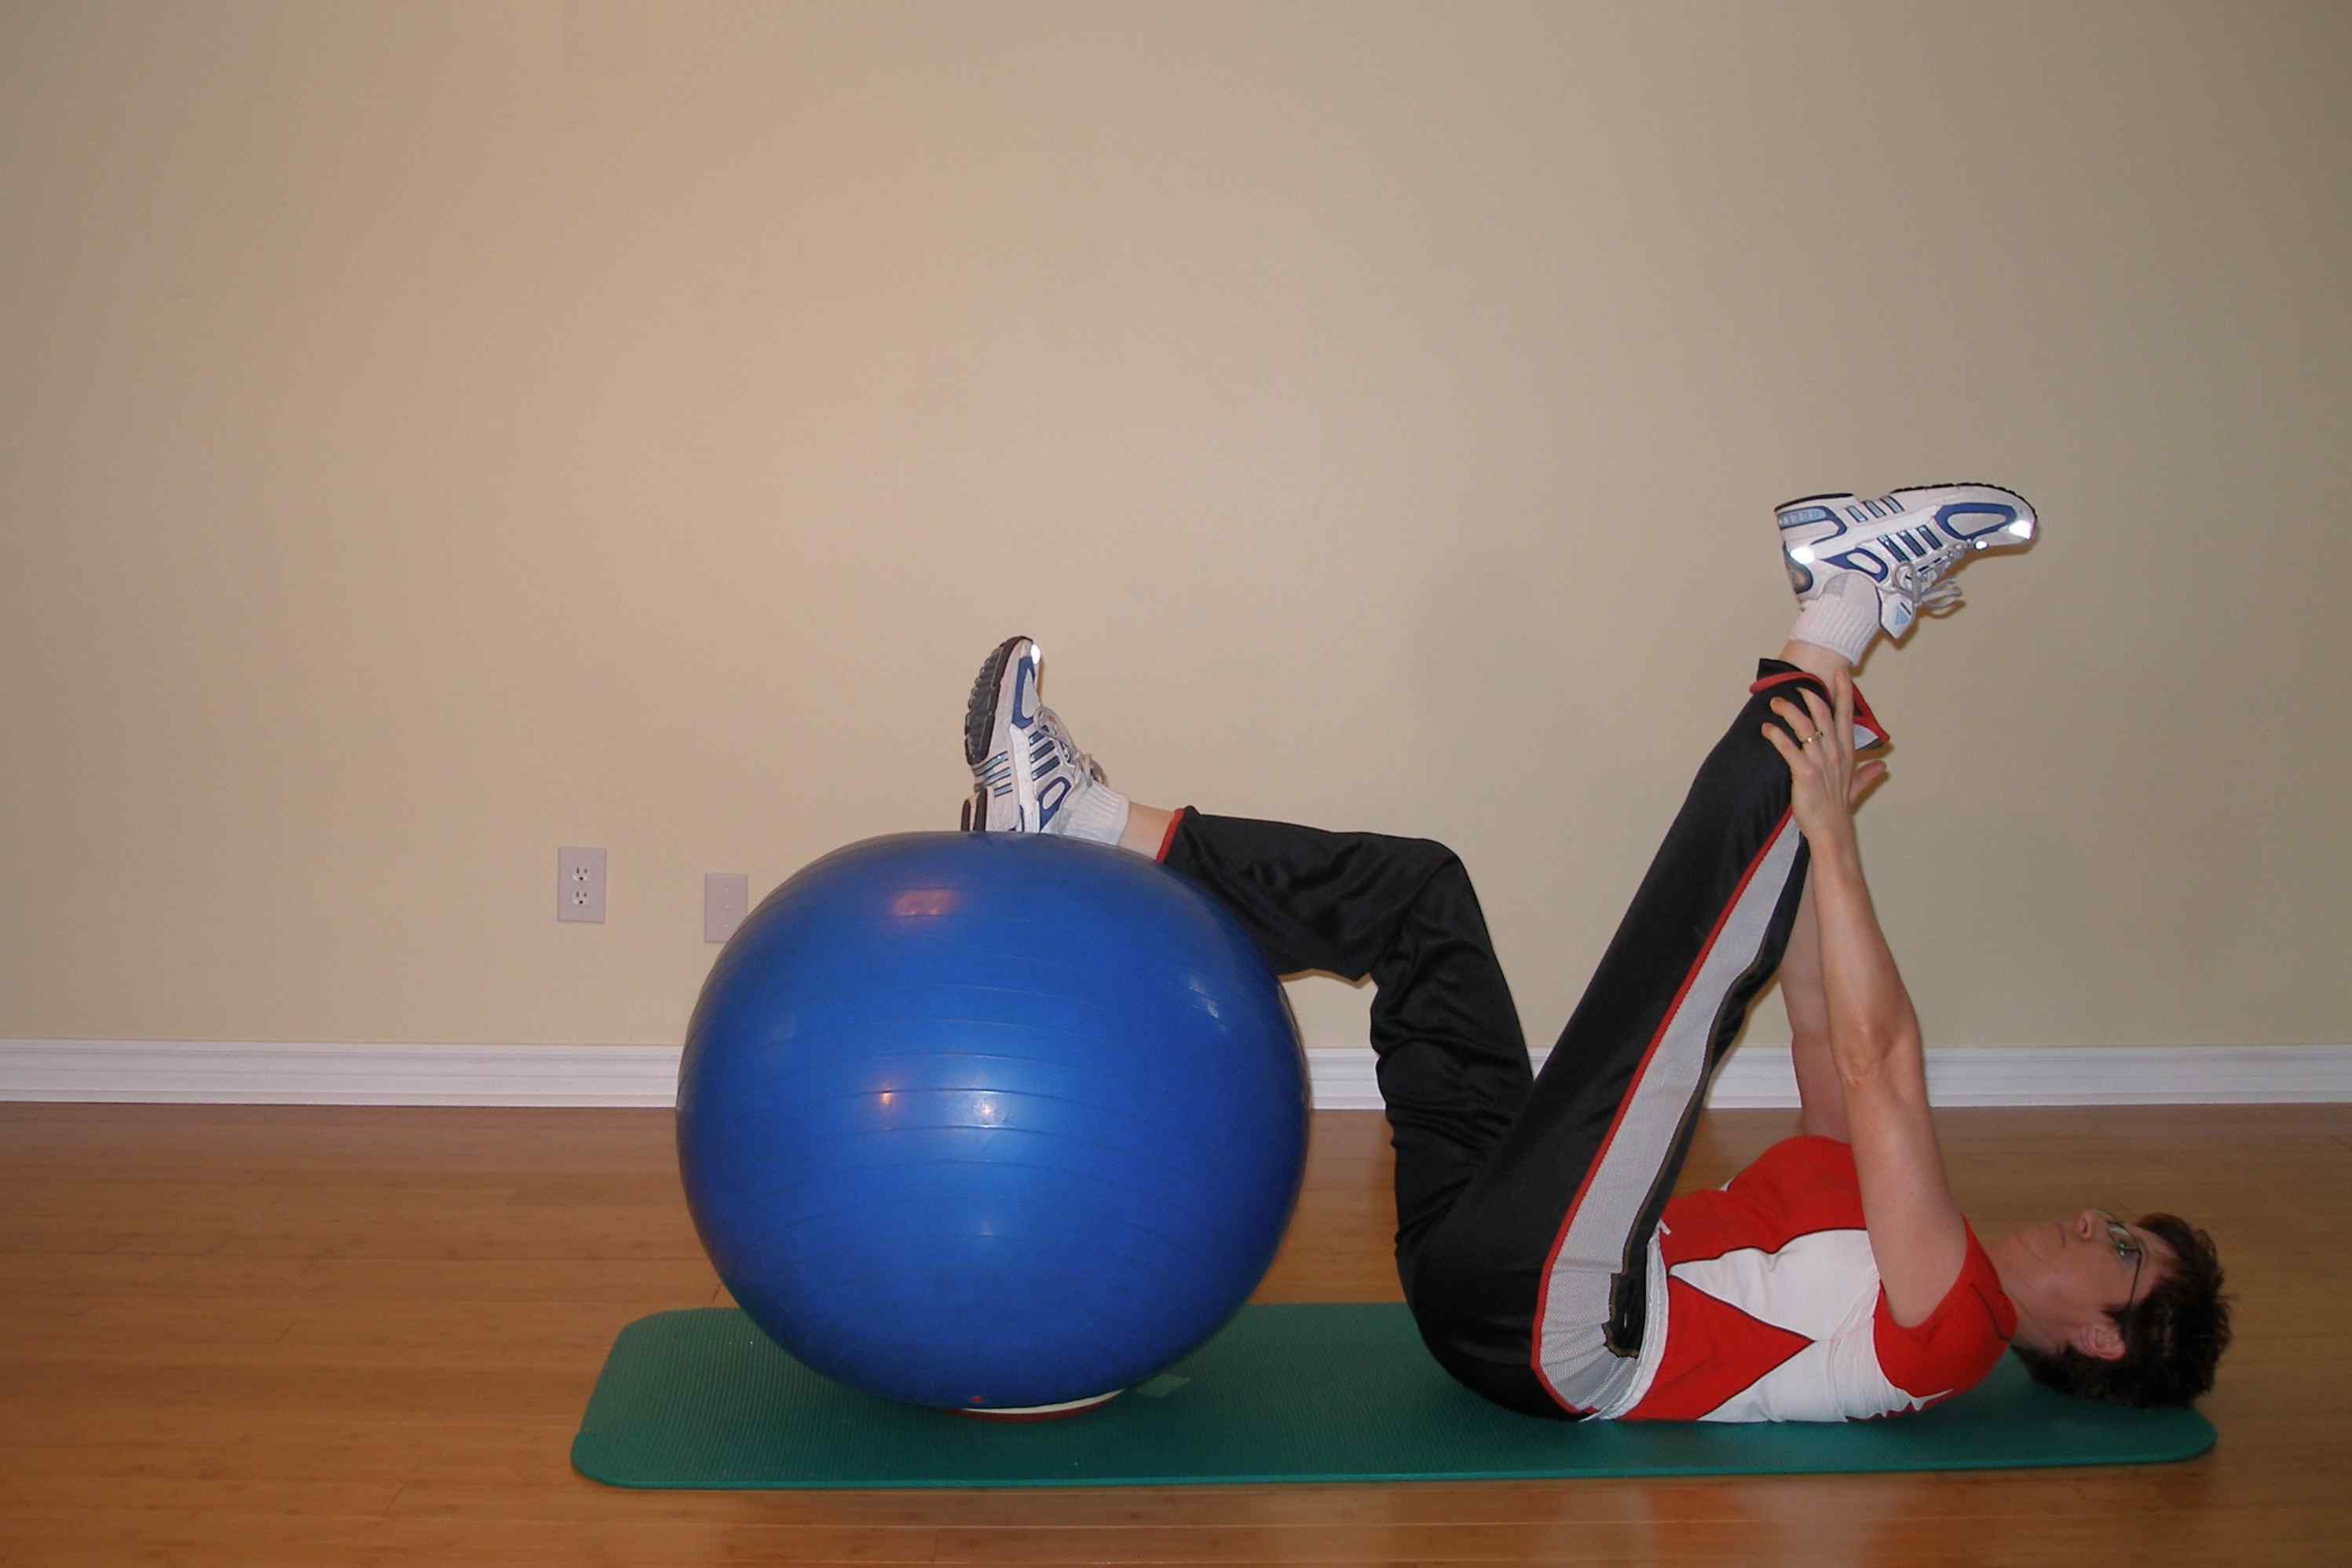
Supine Hamstring Stretch
Lie face up on the floor with your heels resting on the ball.
Roll the ball in so that your knees are at 90 degrees.
Grab one leg and pull it up while maintaining a straight or only slightly bent knee.
Try and keep your lower back and pelvis on the floor.
Hold this position.
Stretches: Hamstrings

Hip Rotator Stretch
Start by lying supine on the floor with your heels resting on the ball.
Cross your ankle over your thigh and let your knee fall outward.
Roll the ball toward you with your heel so that you feel a stretch in your glutes.
Try and keep your lower back and pelvis on the floor.
Hold this position.
Stretches: Glutes and hip rotators

Supine Trunk Rotation
Lie face up on the floor with your heels bent and your feet flat on the floor.
Hold the ball in your hands overhead on the floor.
Roll your knees to the side while keeping the ball stationary.
Hold this and then repeat on the other side while keeping your feet on the floor.
Hold this position.
Stretches: Trunk rotators and spinal ligaments

Lat Stretch with Trunk Rotation
Kneel on the floor and place your forearms across the front of the ball.
Rest your head on your hands.
Roll the ball and your hands to one side gently rotating your middle back.
Make sure your back is flat. If not, you may need to move the ball further away from you.
Hold this position.
Stretches: Trunk rotators and latissimus dorsi
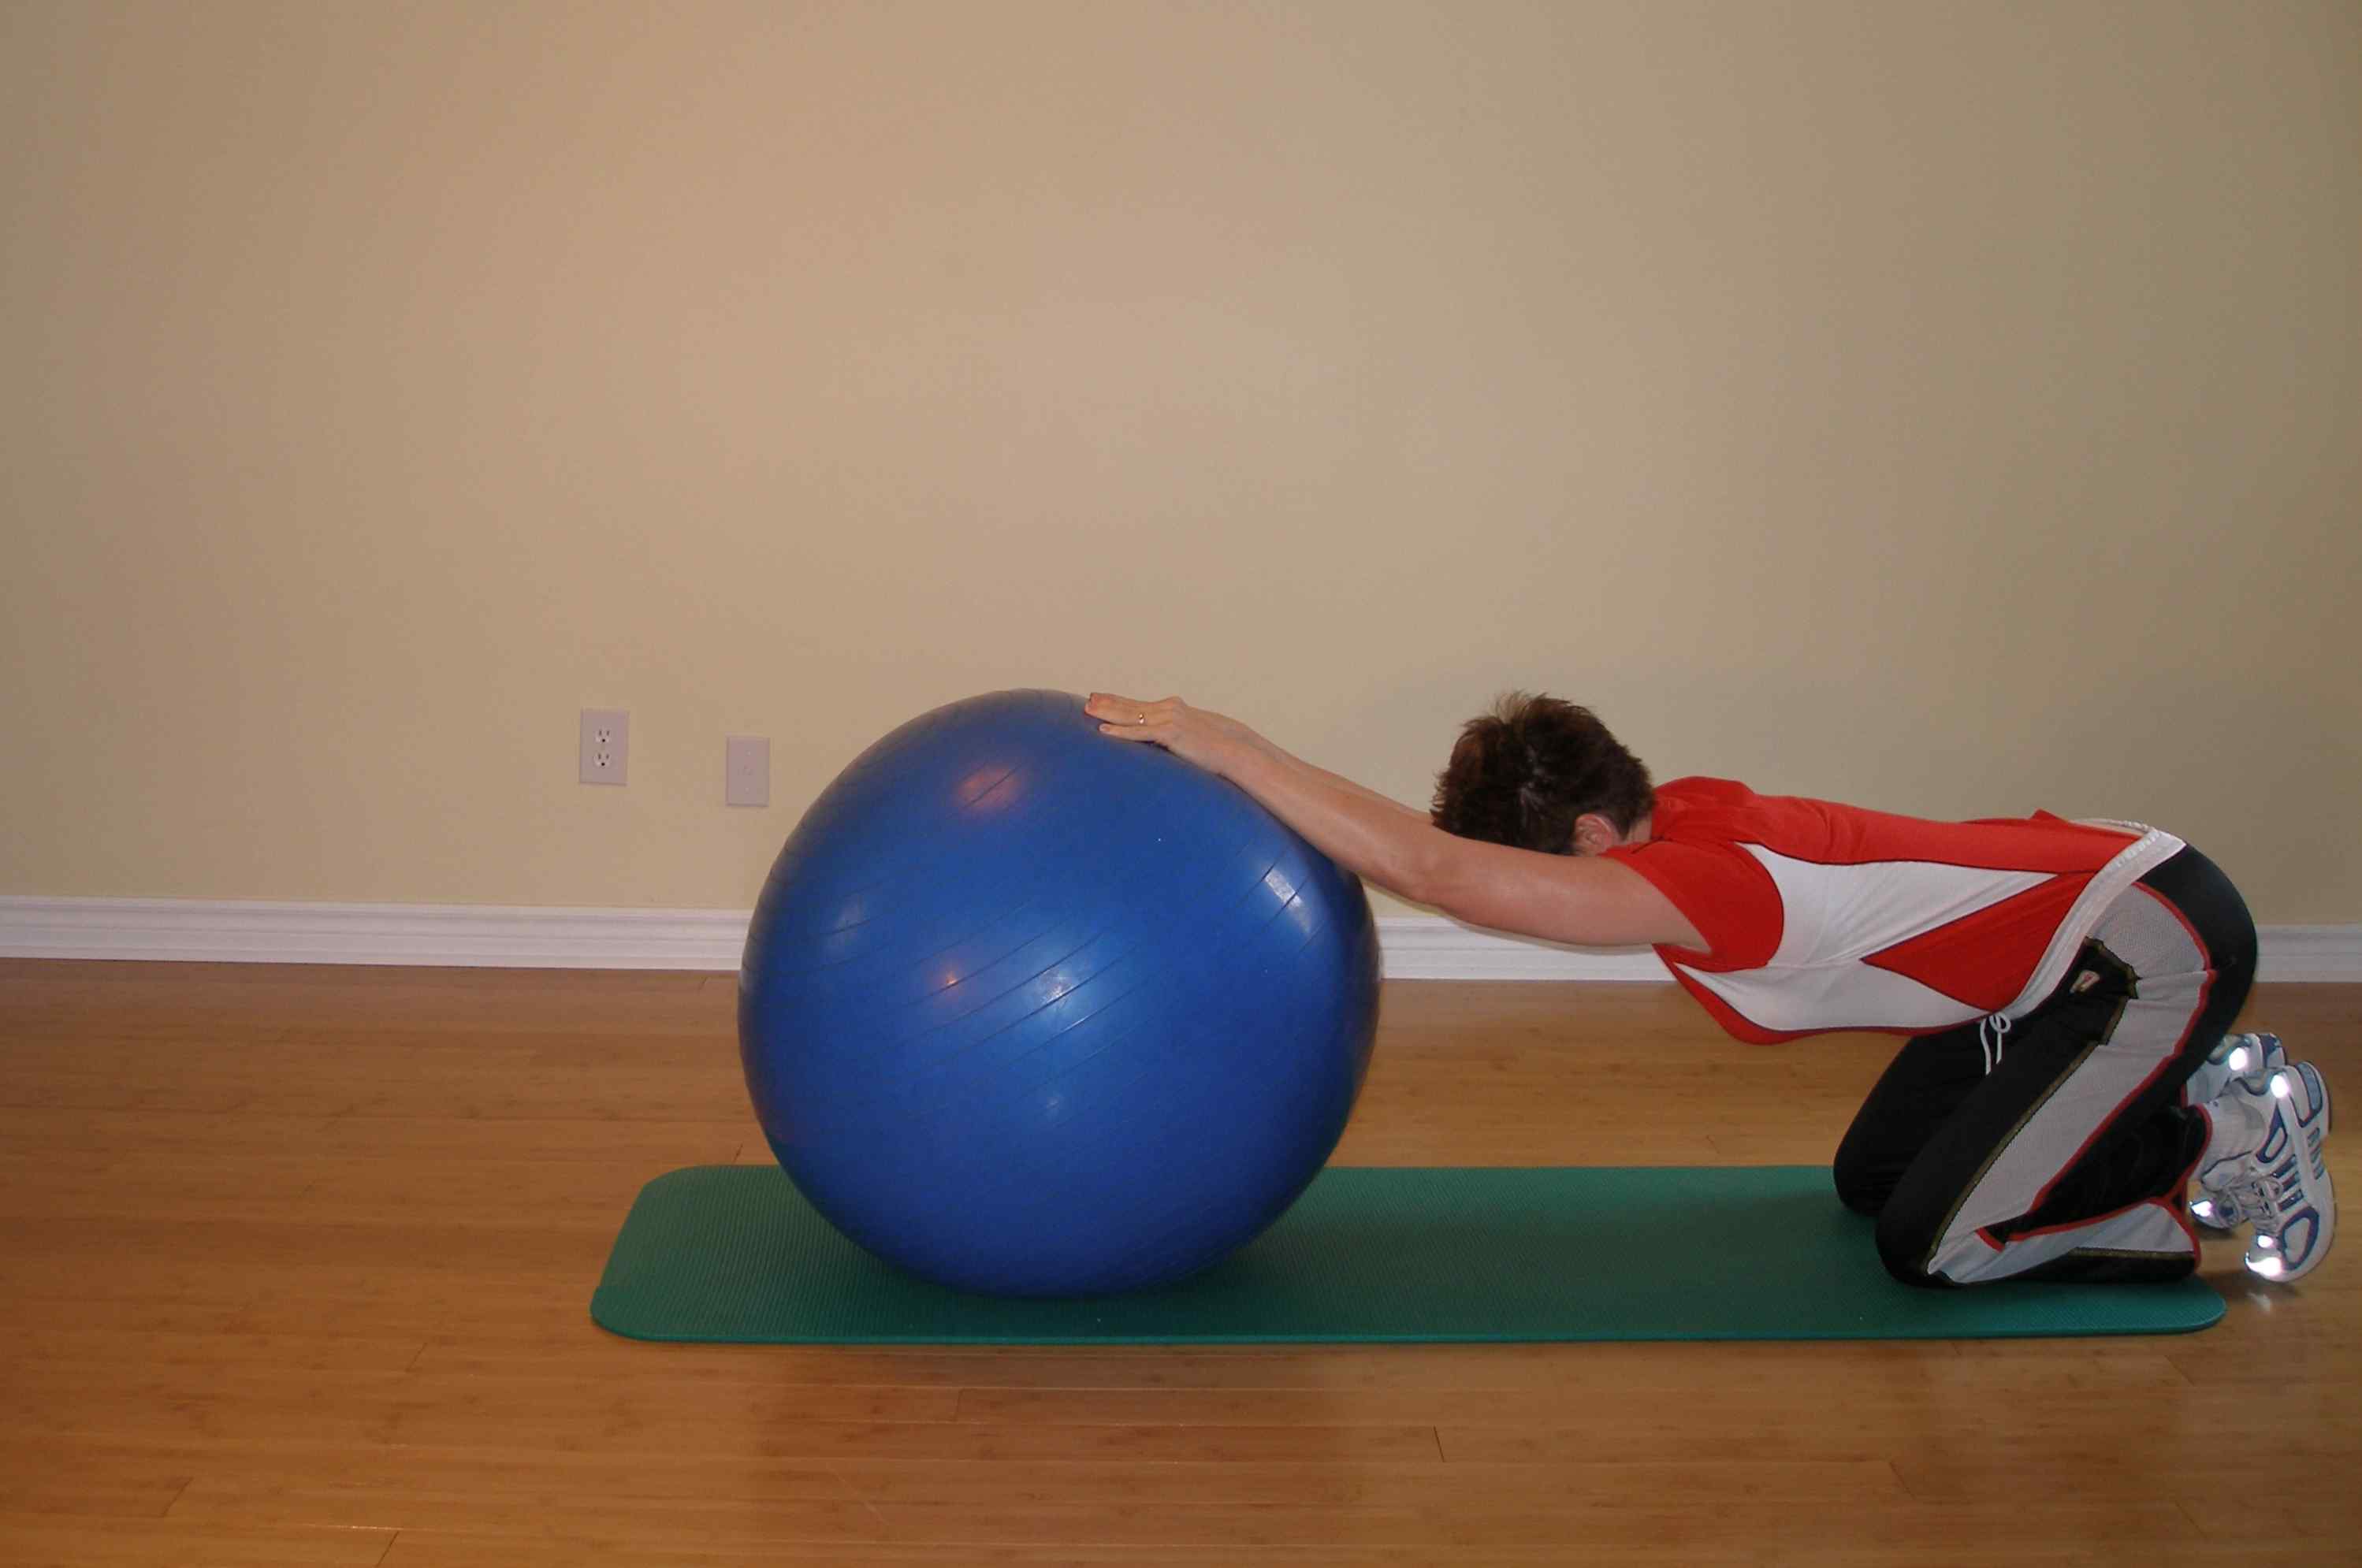
Lat Stretch
Kneel on the floor and place your hands across the top of the ball.
Let your back sag into the stretch.
Sit back on your heels as you roll the ball forward. Hold this position.
Stretches: Glutes, spinal ligaments and latissimus dorsi

Side Stretch
Kneel on the floor behind your exercise ball and place your hand on the side of the ball.
Roll the ball across in front of your body to the opposite side as you sit back toward your heels.
You should feel a stretch down your side from your shoulder blade to your hip.
Hold this position.
Repeat this on the other side.
Stretches: Glutes, latissimus dorsi, trunk side flexors

Pec Stretch
Kneel on the floor with the ball on your right side and your right hand resting on it.
Lower your chest toward the floor and support your weight with your left arm.
Turn your trunk away from the ball to feel a stretch in your right pecs.
Hold this position.
Repeat this on the other side.
Stretches: Pectoral muscles

Lying Side Stretch
Kneel on the floor with your exercise ball resting against your thigh
Lie over the ball, extending your outer leg and reaching over head to stretch sideways over the ball.
Hold this position.
Repeat this on the other side.

Quad Stretch
Lie forward over the ball so that your belt line is centred over the ball.
Raise your leg and arm off the floor, reach around and grab your ankle.
Lift your leg and pull your heel toward your buttocks to feel a stretch on the front of your thigh.
Hold this position.
Repeat this on the other side.
Stretches: Quadriceps

Hip Flexor Stretch
Sit forward on the edge of the ball with feet wide apart.
Pull your chest up and roll the ball forward until you feel a stretch on the front of your hip.
Make sure your feet are both facing in the same direction and your back heel is off the ground.
Hold this position.
Repeat this on the other side.
Stretches: Hip flexors

Hamstring Stretch
Sit forward on the ball with feet wide apart.
Turn your body over one leg.
While keeping your back straight, lower your chest toward that side.
Roll the ball back to straighten the knee.
Hold this position.
Repeat this on the other side.
Stretches: Hamstrings

Hip Adductor Stretch
These exercise ball exercises require you to sit forward on the exercise ball with feet wide apart, hands on your hips or thighs.
Roll the ball slowly to one side until you feel a stretch on the inside of your thigh.
Hold this position.
Repeat this on the other side.
Stretches: Hip adductors

Seated Glute and Back Stretch
Sit forward on the exercise ball with feet wide apart, hands on your hips or thighs.
Slowly lean forward
Rest your elbows on your knees or, if you are flexible enough, put your hands on the floor.
Gently roll the ball back and pull your chest up to increase the stretch in your thighs and buttocks.
Hold this position only briefly.
Stretches: Glutes, lumbar extensors
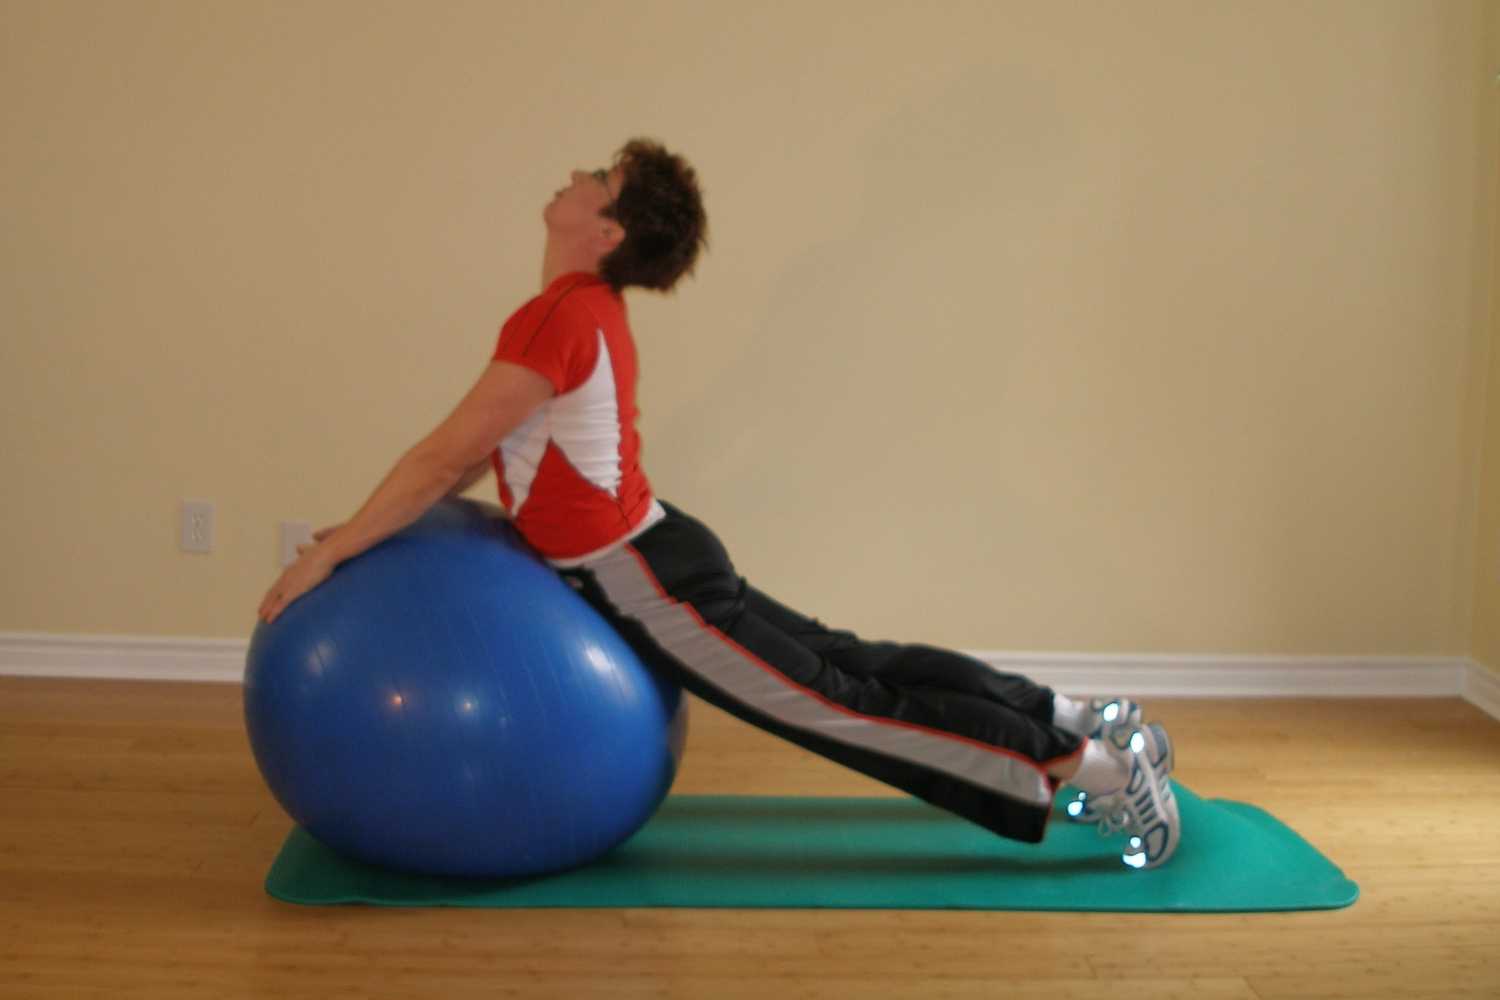
Prone Back Extension
Lie forward over your exercise ball and rest your hands over the other side of it.
Push up to straighten your elbows.
Keep your pelvis in contact with the ball and let your back sag into the exercise ball.
Hold this position only briefly.
Stretches: Hip flexors and spinal ligaments.

Pec and Subscapularis Stretch
Lie back over the exercise ball with the ball centred under your thoracic spine.
Bring your arms up so that they are at 90 degrees to your body and your elbows bent to 90 degrees.
Keep your pelvis in contact with the ball and let your back sag into the exercise ball.
Allow gravity to pull your elbows back and your hands to the floor.
Hold this position.
Stretches: Pectoral muscles, subscapularis
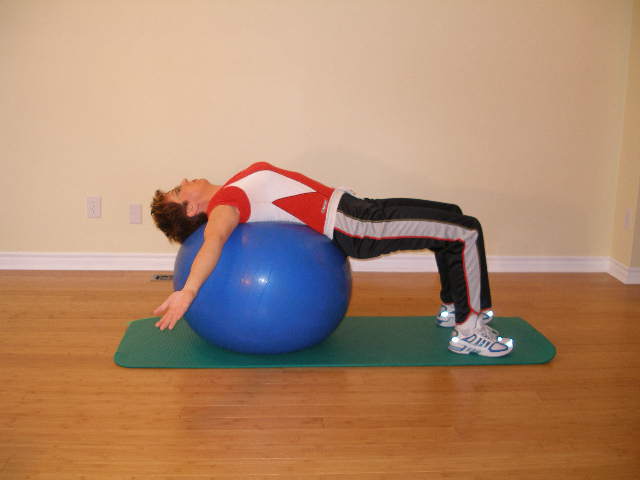
Pec Stretch Supine
Lie back over the exercise ball with the ball centred under your thoracic spine.
Bring your arms up so that your shoulders are at 90 degrees to your body and your elbows straight.
Keep your pelvis in contact with the ball and let your back sag into the exercise ball.
Allow gravity to pull your arms back to the floor.
Hold this position.
Stretches: Pectoral muscles

Trunk Rotation Stretch
Kneel down onto one knee with your other foot behind you.
Holding the exercise ball in front of you bring your arms up so that your shoulders are at 90 degrees to your body.
Rotate your trunk as far as you can to the side
Hold this position.
Stretches: Trunk rotators and spinal ligaments
2. Before the Ball
The exercise ball exercises in these workouts demand that you maintain a neutral spinal position throughout the exercise and you will feel what it is like to move your pelvis as an independent unit.
If you've been practicing the floor exercises on this site on a stable surface you should be able to find your neutral position now in lying, sitting, standing and when on all fours.
Rather than performing a set number of repetitions, don't get hung up on numbers. Do the exercises until you feel you are no longer able to hold correct form. You may feel your back or pelvis sagging or shaking. It is at this point that your stabilizing musculature has reached the point of fatigue. We call this technical failure. (Failure to maintain proper technique.) The larger superficial muscles on your trunk are trying to stabilize your body but are unable to make the fine adjustments necessary. That's why you feel the shaking.
Remember, if you feel your back sagging, arching, or your pelvis tilting, you have reached technical failure and should stop and rest for a couple of minutes before attempting the exercise again.
If you've mastered the basics of lumbar stabilization in a neutral position on a stable surface we can now introduce the unstable surface in a basic exercise ball workout.
Introducing an unstable exercising surface should occur after one has mastered exercises on a stable surface. Core exercises can be learned without a stability ball. Core stability training begins with learning to co-contract the transversus abdominus and multifidus muscles effectively, as this is key to the lumbar-support mechanism. To do this you must perform the 'abdominal hollowing' technique with the spine in the neutral position. Use your fingers for 'biofeedback' on either side of your lower abdomen to feel the tension in the transversus abdominus muscle.
It is essential that this is mastered before progressing any further
For all core stability exercises a transversus abdominus contraction should be maintained
Several errors are often made when attempting to activate these muscles:
Your pelvis is tilted posteriorly (i.e. your back gets pushed against the floor
You overuse the large lumbar extensor muscles arching your lower back further off the floor.
You activate the more superficial abdominal muscles causing your abdomen to bulge.
Core stabilization should be a low-grade, mild contraction of tonic muscles which can be held for a long time (20 seconds to several minutes), not just a sudden contraction. You need to learn to do this in different positions (lying, kneeling, standing, sitting, etc.) and eventually incorporate this muscle activity during activities of daily living.
Try to master the following core exercises while maintaining neutral position before introducing the exercise ball:

Bird Dog Exercise
Maintain tight abdominals through the abdominal hollowing method prior to moving your arm or leg.
Physio Tips
Progression
The superman exercise on the floor is a good exercise on many levels. Not only does it force the trunk stabilizers to work in maintaining a stable spine but it also uses the often neglected scapular rotators. The rhomboids, middle and lower trapezius muscles work to rotate and retract the shoulder blade to allow the arm to be elevated. Weaknesses in the scapular rotators can lead to rotator cuff impingement, tendonitis and bursitis. If you have shoulder pain doing this exercise you may have underlying shoulder issues and you should consult your physical therapist.
This exercise is also good for the gluteal muscles. The large muscles that extend the hip often weaken in people that sit for prolonged periods. Weak glutes can contribute to both back and knee pain.
- The superman exercise requires you to kneel on your hands and knees, hands below your shoulders, and knees below your hips.
- Use a yoga mat or pillow if you find it uncomfortable on your knees.
- Keep your lumbar spine in the neutral position.
- Ensure your upper back is also extended, chest up and shoulders back.
- Set your core muscles, bracing your abdominals.
- Keep your neck straight and chin tucked in.
- Press your tongue to the roof of your mouth
- Stay relaxed and keep breathing.
- Slowly slide one leg backwards, extending the knee and lifting the foot.
- At the same time lift the opposite arm.
- As you extend the leg back and arm up, use your core muscles to maintain a neutral lumbar spine and level pelvis.
- Hold this position.
- If you feel you're not ready to add the ball yet, you can still make this more difficult by adding light ankle and wrist weights, or just holding onto a light dumbbell (1-2kg).

Bridging
Be sure to lift your pelvis so that you form a straight line from your knees to your shoulders. Keep abdominal muscles tight the whole time.
We use this exercise frequently in the clinical setting for the rehabilitation of back injuries. The glutes work with the lumbar paraspinal muscles during functional activites to extend the hips and spine. It is when you lose coordination or strength in these groups of muscles that you are particularly vulnerable to injury.
This exercise can also be used as a starting point for other exercises. If you are finding the above exercise getting easy try the one below:
Leg Raise while BridgingYou can see there are many variations that employ bridging. I've mentioned just a few.
- Contract your abdominal muscles and set your transversus abdominus through Abdominal Hollowing.
- Slowly lift your buttocks off the floor until your trunk is straight from your knees to your shoulders without losing the neutral position.
- Only lift so high that you form a straight line from your knees through your trunk. Do not lift so high as to put weight on your neck.
- If you are not yet confident about introducing an unstable surface you can a) put your feet on a pillow or piece of foam and try the above exercise, or b) prop your ball in a corner and try bridging on the ball
- Another way of making this more challenging is by introducing some asymmetry. In the starting position, cross one ankle over the other knee and then lift up onto the one leg for a bridge on one leg.
- Lie on your back with knees bent, arms at your sides as above.
- Lift your pelvis by pushing through your feet and engaging your abdominal muscles. Hold yourself up in that position, and then straighten your right knee. You are bridging on one foot, thighs and knees remain next to one another, but with the one leg straight.
- Hold this for a few seconds, return your foot to the floor, and then lower yourself.

Side Plank
You should form a straight line from your feet to your head. If you lack strength in your shoulders try bending your knees and performing the side plank from your knees. Don't do this exercise if it causes shoulder pain.
This exercise works well in any beginner workout. If you are finding it difficult, try side bridging on your knees. This is a much more elementary exercise we often use in the clinic for those recovering from back injuries. If you have a history of back problems or have pain seek the advice of your physical therapist prior to trying any of these exercises. With a history of back pain you may need to start with an even easier exercise.
- Lift your hip off the floor, creating a straight line from heel to shoulder and keeping your head in line with your spine.
- Side trunk muscles are emphasized in this exercise - hip abductors, quadratus lumborum, etc.
- Abdominal obliques, latissimus dorsi are also very active.
- Side bridges improve the stability of all the muscles surrounding your spine and stomach.
- Researchers have found that men who can perform the side bridge effectively are less likely to encounter back troubles.
- Be sure to keep your arm vertical, elbow under your shoulder. An elbow too far forward will put too much strain on your shoulder
- Concentrate on breathing normally and keeping your abdominals tight, maintaining neutral position.
- Hold this until you are no longer able to stay straight, feel yourself sag, or start to shake.
- Rest for a minute or two.
- Repeat this two more times.
- Perform this daily until you can hold this exercise for 30 seconds
- Once you are able to hold this side plank on your knees for 30 seconds with little effort you are ready to attempt it on your feet.
- If you find this difficult try Side Plank on your Knees

Plank
A staple in all core exercise workouts is the plank. You should form a straight line from feet to head while keeping abdominal muscles engaged.
- lie on your stomach propping yourself up with your elbows under your shoulders.
- Forearms lie in front of you, comfortably, with hands relaxed or placed in a fist.
- Lift your legs and hips off the floor such that you are straight from your heels to your shoulders.
- Make sure your elbows remain under your shoulders.
- Don't look up, keep your chin tucked in, and don't allow your back to arch up to the ceiling
- Concentrate on engaging your abdominal muscles and breathing normally.
- Hold this position.
Physio Tips
- I will use this exercise clinically to help assess core endurance. This can be measured and used to monitor progress in an exercise program.
- This exercise has a greater risk of increasing back pain.
- Don't push beyond the point where you can maintain perfect form. To do so does not benefit you.
- If you experience any pain while doing these exercises, stop the exercise and consult with a physical therapist.
- Make sure your arm is vertical and positioned directly under your shoulder so as to avoid shoulder strain.

Straight Leg Raise
Perform the abdominal hollowing exercise in lying prior to lifting your leg. If you put your hand behind your back while doing this exercise you should not feel any movement in your back or pelvis. If you find this difficult, do it with both knees bent.
This is one of the easier exercises we use in the clinic to teach lumbopelvic control. If you slide your hand under your lower back while performing this leg raise exercise your should not feel your back move up and down as your leg moves up and down.
If you cannot maintain a stable spine in this position you probably will have very little control on the ball. Practice this until you are familiar with your neutral lumbopelvic position.

Abdominal Hollowing/ TA sets
You should feel your abdominal muscles tighten as your navel moves up and in while your lower back and pelvis remains stationary. Master this before going any further with any ball exercises.

Russian Crunch
This is a more difficult abdominal exercise I added. Don't worry if you can't do it at this point.
- Cross your arms over your chest and lift your shoulders off the ground as if doing a crunch to about 45 degrees.
- You should be comfortable enough to maintain your neutral position and breath normally
- Twist your right shoulder up toward your left knee hold that position.Twist your left shoulder up toward your right knee and hold that position.
- Squeeze your chin toward your chest as though there were an orange there to activate neck stabilizers and prevent neck strain. Pressing your tongue to the roof of your mouth will assist in activating deep neck flexors to help stabilize your neck.
The seated Russian crunch exercise is a little more advanced for a floor exercise. It forces you to stabilize your spine while incorporating a functional movement pattern. This is something required in activities such as vacuuming, golfing, paddling a kayak, swinging a bat, and throwing a ball.
3. Progression
Exercise progression is necessary in any exercise program to improve strength and endurance. Muscles must be challenged continuously in order to develop. Muscle will adapt over time to a given load, becoming more efficient. If your body is challenged beyond what it is used to doing it will respond by increasing strength and endurance. For continued benefits from exercising, challenges need to be increased.
Factors that determine the difficulty of an exercise ball exercise:
- Lever System - As ball support moves further from the point of support on the floor, the more difficult the exercise becomes. The closer the ball is to the midline of the body the less flexibility and stabilizing is required. For example during push ups on the ball, the longer the distance between the support points ( the ball and the arms) the harder the exercise will become.
- Base of Support - Reducing the contact surface of any supporting limb can increase the neural demand of any exercise. Push ups with one foot on the ball is more difficult than push ups with both feet on the ball. Blowing up the ball so that is is firmer reduces the area of contact of the ball with the floor making it less stable. Moving the supporting limbs on the ball closer together reduces your base of support also making the exercise more demanding.
- Speed of movement - The faster movement changes your centre of gravity relative to your base of support requiring quicker adjustments.
- Adding Resistance - The addition of weights and resistance bands
- Visual Input - Closing your eyes during the exercise removes visual feedback as to where your body and the ball are in space forcing you to rely on proprioceptive input form joints and muscles.
A static exercise ball exercise is one that requires you to maintain a certain position for an extended period of time to emphasize endurance in the spinal stabilizers. When you are beginning an exercise ball exercise program you might hold each position for 5 -10 seconds. To progress these hold each for longer periods, up to 30-45 seconds. A good measure of how long to hold a position is technique failure. As soon as you lose your neutral position, the benefits of the exercise are gone. Take a rest. As your endurance improves, you will only need to do say 5 repetitions held for 45 seconds each. An example of a static ball exercise is the reverse plank.
A dynamic exercise ball exercise require you to move while maintaining a stable trunk or core. An exercise progression for this type of exercises is to perform more repetitions. Use technique failure as a measure of how many repetitions to perform. Perform as many repetitions as you can before your technique fails. Then rest. Once you can perform 20 or 30 repetitions before failure then it is probably time to move on to a more challenging exercise. An example of a dynamic exercise is the rolling plank.
Exercise progression for these exercises can be made by simply adding light ankle and wrist weights. Make sure you are able to perform 20-30 repetitions of the exercise without weight easily enough before adding the extra resistance. Remember that you are increasing the challenge to your core stability as well as your prime movers and you will not be able to use as much weight on the ball as you do a bench. An example using limb movements is the prone leg raise exercise.
The fundamental rules of exercise progression for training the core are the same as those for training any other segment in the kinetic chain.
Simple to Complex:
Start simple, progressing to more complex exercises only after you master the basic movements of each exercise.
Known to Unknown:
The training environment should begin with controlled, low-neuromuscular-demand exercises and then proceed to less-controlled, more proprioceptively challenging environments. Start an exercise with a spotter or someone to help support the ball while you get accustomed to the movement patterns involved.
Low Force to High Force:
Train with low resistance controlled movements until you can master the exercise. A progression in exercise is to add light wrist or ankle weights.
Static to Dynamic:
Start with exercises in a stationary posture, then as those movements are mastered, add more dynamic movements. Practice bridging for sustained periods prior to trying the hamstring curls. Practice the reverse bridge and hold it before trying leg raises.
Lying to Sitting to Kneeling to Standing (two legs) to Standing (one leg):
Lying and sitting are proprioceptively less challenging than standing. Standing on one leg is proprioceptively more challenging than standing on two legs.
Core exercise programs should be tri-planar, multi-dimensional and proprioceptively enriched. Because the core consists of slow-twitch muscles, it can be trained daily. However, it is important to vary the movement and type of loading to prevent over training and avoid possible injury.
While it's nice to have access to all of these free exercises on the web, nothing can substitute for the instruction from a physical therapist or a personal trainer. If you are unsure of your technique or are concerned that an exercise may be appropriate for you when trying any free exercises found on the internet consult your professional for some feedback.